> ## Documentation Index
> Fetch the complete documentation index at: https://www.text.com/docs/llms.txt
> Use this file to discover all available pages before exploring further.
# Create tickets with order context from events across multiple Shopify stores
> Run a webhook service that verifies incoming Shopify events from multiple stores, fetches the order and customer data from Shopify's Admin API, and creates a ticket with order context.
This guide is for teams running [Shopify](https://www.shopify.com) stores who want to centralize event-based order support, so a payment problem, a refund, or a failed delivery reaches the correct ticketing team with the right priority and contextual order details.
By the end of this guide, you'll have an adaptable service that listens for Shopify webhooks from every store you configure, and creates a ticket carrying the correct team, priority, tags, order ID and link, and shopper details.
## Prerequisites
**You'll need:**
* A [Text account](https://accounts.livechat.com/signup?landing_page=https%3A%2F%2Fwww.text.com%2F\&client_id=fc7bf1555adb6d3d2a441f10fd5b6eb5\&redirect_uri=https%3A%2F%2Fwww.text.com%2Fapp\&response_type=token\&source_type=website\&source_id=header-signup\&source_url=https%3A%2F%2Fwww.text.com%2F) with permission to create personal access tokens.
* A [Shopify Dev Dashboard](https://dev.shopify.com) account, to create one or more stores and the app that connects them.
* [Node.js](https://nodejs.org/) 22 or later, to run the service.
* [ngrok](https://ngrok.com), to give the local service a public HTTPS address during setup and testing.
* [Git](https://git-scm.com/downloads), to clone the [example repository](https://github.com/livechat/shopify-text-ticketing).
This guide is based on an existing sample service repository. It walks you through creating Shopify stores, an app with Admin API access, and webhook subscriptions. On the Text side, it provisions teams, tags, and custom fields — none need to exist beforehand.
The service keeps deduplication in memory, so a restart can lose track of a
delivery Shopify retries and create a duplicate ticket, and it isn't hardened
against Text or Shopify API failures. Treat this as a reference implementation
to adapt, not a production-ready deployment — see [Prepare the service for
production](#prepare-the-service-for-production).
## How an event becomes a ticket
The service subscribes to three Shopify webhook topics per store: `orders/create`, `refunds/create`, and `fulfillment_events/create`. For each delivery, the service does the following:
1. Identifies which store sent the event and verifies Shopify as the sender.
2. Looks up the order's financial status, fraud risk assessment, and customer lifetime spend with one Shopify Admin GraphQL call. None of that data is in the webhook payload itself.
3. Checks the enriched event against the routing table to decide a team, priority, and tags.
4. Creates the ticket through the [ticketing API](/docs/api/ticketing).
The routing table is fixed in this sample and is the part you're most likely to change for your own teams:
| Shopify event | Condition | Team | Priority | Tags |
| --------------------------- | ------------------------------------------------------------------ | ------------------------- | -------- | --------------------------- |
| `orders/create` | Fraud risk assessment is `HIGH` | Payments | High | store tag, `payment-review` |
| `orders/create` | Payment is `pending` or `authorized` | Payments | High | store tag, `payment-review` |
| `refunds/create` | Always | Returns & Refunds | Medium | store tag, `refund` |
| `fulfillment_events/create` | Status is `failure` or `attempted_delivery` | The store's shipping team | High | store tag, `delivery-issue` |
| Any of the above | Customer's lifetime spend is at or above the store's VIP threshold | VIP | Urgent | previous tags, `vip` |
The first matching rule wins, and a VIP override can then replace its team and priority. An order that's paid, low-risk, and not from a VIP customer produces no ticket.
## Set up the Shopify side
You need one Shopify store per entry you'll add to the service's configuration. Two stores are enough to see multi-store routing at work.
Sign in at [dev.shopify.com](https://dev.shopify.com). Under **Stores**, create a development store for each store you want to route events from — development stores stay free for as long as you need them, which is why they're the default here.
For development stores, choose the **Grow** plan and the **Generate data for store** option. Development stores remain free, while the Grow plan lets a custom app read the customer names and email addresses this integration needs. Generated data gives you products and customers to test with from the start.
A non-development store works too if it uses the [Grow plan or higher](https://help.shopify.com/en/manual/apps/about-apps#custom-level-2-pii-apps) and belongs to the same Dev Dashboard organization as the app you create next.
Name each store after the key you'll give it in `config/stores.json` later — for example, `acme-main` for a store key of `main` and `acme-outlet` for `outlet` — so the two stay easy to tell apart. Note each store's `.myshopify.com` domain from its admin URL.
Before creating your app, confirm that the organization shown in the Dev Dashboard is the organization that owns the stores you want to connect.
 One app serves every store in the organization. In the [Dev Dashboard](https://dev.shopify.com), under **Apps**, create an app using the manual path rather than the Shopify CLI template — this app has no UI.
Because you create the app from your own Shopify account, Shopify treats it as a custom app for your organization. The app works only with stores in that organization and isn't published in the Shopify App Store.
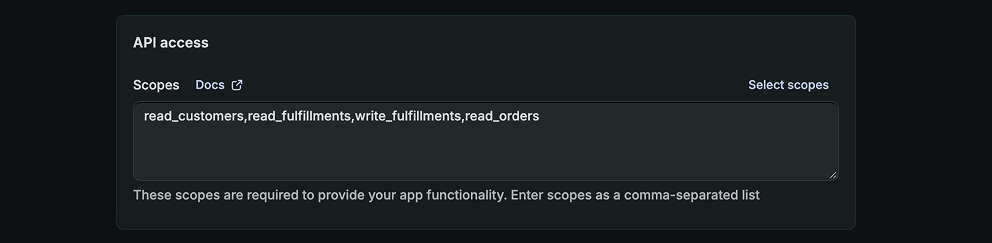
When you create the app, you define its access scopes. Under **API access → Scopes**, add `read_orders`, `read_customers`, and `read_fulfillments`. Add `write_fulfillments` too if you want to simulate a failed delivery for testing, since Shopify's admin has no button for that event.
One app serves every store in the organization. In the [Dev Dashboard](https://dev.shopify.com), under **Apps**, create an app using the manual path rather than the Shopify CLI template — this app has no UI.
Because you create the app from your own Shopify account, Shopify treats it as a custom app for your organization. The app works only with stores in that organization and isn't published in the Shopify App Store.
When you create the app, you define its access scopes. Under **API access → Scopes**, add `read_orders`, `read_customers`, and `read_fulfillments`. Add `write_fulfillments` too if you want to simulate a failed delivery for testing, since Shopify's admin has no button for that event.
 Then, release the app version.
Customer names and email addresses are protected customer data. For a
custom app, the scopes you added provide access after installation; no
separate data-access request is needed.
Install the app on every store you created, either from the install button next to the store or through a generated install link opened while signed in to that store.
From the app's settings page, copy the **client ID** and **client secret**. The service exchanges them for a 24-hour Admin API token per store, and Shopify signs every webhook with the same client secret.
## Set up the Text side
In Text, go to **Settings → API access → [Personal access tokens](https://www.text.com/app/settings/integrations/api-access/personal-access-tokens)** and create a token with the `accounts--my:ro` [scope](/docs/authentication/scopes) — this is the scope the ticketing API expects for authentication.
Note your **account ID**, shown next to the token. The service sends the token as HTTP Basic auth, with the account ID as the username and the token as the password.
Treat the personal access token like a password. Store it in a secrets
manager for a deployed service, and never commit it to a repository.
In the terminal, clone the repository and install its dependencies:
```shell theme={null}
git clone https://github.com/livechat/shopify-text-ticketing.git
cd shopify-text-ticketing
npm install
cp config/stores.example.json config/stores.json
cp .env.example .env
```
In `config/stores.json`, keep one entry per Shopify store you created and remove the rest. Set each entry's `key` to the name you gave the store and `shopDomain` to its real domain. In our example:
```json config/stores.json theme={null}
{
"stores": [
{
"key": "main",
"label": "Acme Main",
"shopDomain": "acme-main.myshopify.com",
"credentialsKey": "ACME",
"shippingTeam": "Orders & Shipping",
"vipThreshold": 1000
},
{
"key": "outlet",
"label": "Acme Outlet",
"shopDomain": "acme-outlet.myshopify.com",
"credentialsKey": "ACME",
"shippingTeam": "Orders & Shipping",
"vipThreshold": 500
}
]
}
```
`credentialsKey` points a store at its `SHOPIFY__CLIENT_ID` and `SHOPIFY__CLIENT_SECRET` pair in `.env` — the name itself doesn't matter, as long as it matches. Use the same key for every store on the same Shopify app; give a store a different key only if it uses a different app.
In `.env`, set `TEXT_ACCOUNT_ID`, `TEXT_PAT`, `SHOPIFY_ACME_CLIENT_ID`, and `SHOPIFY_ACME_CLIENT_SECRET` from the values you copied — the `ACME` suffix matches the `credentialsKey` you kept in `config/stores.json`.
Leave `PUBLIC_URL` empty for now — you'll set it after starting a tunnel.
Run the setup script:
```shell theme={null}
npm run setup:ticketing
```
This creates the teams the routing table refers to (Payments, Returns & Refunds, VIP, and each store's shipping team), the tags each team needs, and two custom fields the ticket carries: `shopify_order_id` and `shopify_order_url`. The script prints one line per resource and is safe to rerun — it doesn't touch anything that already exists.
Each tag is either shared with every team or scoped to one team. The script creates missing tags as shared, because the rule tags a VIP escalation keeps on the ticket (`payment-review`, `refund`, `delivery-issue`) and the per-store tags need to be visible to whichever team the ticket lands in.
If a tag your rules need already exists but is scoped to a different team, the script names it and exits — widen that tag to all teams in the Text app, then rerun the script.
## Run the service and expose it to Shopify
Shopify only delivers webhooks to a public HTTPS address, so a local run needs a tunnel in front of it.
```shell theme={null}
npm run dev
```
A successful start prints:
```text theme={null}
Listening on http://localhost:3000 for 2 store(s)
```
In a separate terminal, start a tunnel to the port the service is listening on:
```shell theme={null}
ngrok http 3000
```
Copy the `https` forwarding address ngrok prints, without a trailing slash, into `.env` as `PUBLIC_URL`. Restart `npm run dev` with the same command — the watcher restarts automatically on source and `config/stores.json` changes, but not on `.env` changes, so a manual restart is always required after editing it.
ngrok's free plan issues a new forwarding address every time the tunnel restarts. When that happens, update `PUBLIC_URL`, restart `npm run dev`, and rerun the next step so Shopify's subscriptions point at the current address. ngrok's local web interface shows every request it forwards at `http://127.0.0.1:4040` while the tunnel runs, which is useful while testing.
If the service already runs somewhere with a stable public HTTPS address, skip ngrok and set `PUBLIC_URL` to that address directly.
```shell theme={null}
npm run register:webhooks
```
This subscribes every configured store to the three topics the service handles, pointing them at `PUBLIC_URL`. A successful run prints one `created` line per store and topic; rerunning it prints `exists`. Because these subscriptions are created through the API rather than the Shopify admin UI, this command is also how you inspect them — they don't appear on the store's **Notifications** page.
## Test the result
During testing, keep the `npm run dev` terminal visible — each delivery logs one JSON line naming the matched rule and ticket.
In one store's admin, create an order with a customer email, choose **Payment due later**, and place it. The log should show `"rule":"pending-payment"`, and a new high-priority ticket should appear in **Payments**, tagged with the store's key and `payment-review`, with the customer as requester and a link to the order.
Create another order in the same store and mark it paid immediately instead of leaving payment pending. The log should show `no ticket needed` — a paid, low-risk order matches no rule.
That confirms the core flow, both when a ticket should exist and when it shouldn't. The scenarios below check the other rules.
In a store's admin, create an order, mark it as paid, then issue a partial
refund on it. The log should show `"rule":"refund"`, and a ticket should
appear in **Returns & Refunds** at medium priority, quoting the refunded
amount.
Create a pending-payment order in a second store. The ticket should land in
the same **Payments** team, tagged with that store's own key instead of the
first store's.
Set a store's `vipThreshold` in `config/stores.json` to a value below one of
its customers' lifetime spend — the dev server picks up the change on its own
— then create a pending-payment or refund order for that customer. The log
should show the rule name suffixed with `+vip`, and the ticket should land in
the VIP team at urgent priority.
Shopify's admin has no button for a carrier event, so simulate one through the Admin API. First fulfill the paid order from its page with **Fulfill items**. Then, with your store's domain and app credentials, fetch a token, find the fulfillment's GID, and record a failed delivery:
```shell theme={null}
STORE=acme-main.myshopify.com
TOKEN=$(curl -s -X POST "https://$STORE/admin/oauth/access_token" \
-d grant_type=client_credentials -d client_id="" -d client_secret="" \
| node -pe 'JSON.parse(require("fs").readFileSync(0)).access_token')
curl -s "https://$STORE/admin/api/2025-07/graphql.json" \
-H "X-Shopify-Access-Token: $TOKEN" -H "Content-Type: application/json" \
-d '{"query":"{ orders(first: 5, reverse: true) { nodes { name fulfillments { id } } } }"}'
curl -s "https://$STORE/admin/api/2025-07/graphql.json" \
-H "X-Shopify-Access-Token: $TOKEN" -H "Content-Type: application/json" \
-d '{"query":"mutation { fulfillmentEventCreate(fulfillmentEvent: { fulfillmentId: \"\", status: FAILURE, message: \"Address not found\" }) { fulfillmentEvent { id } userErrors { message } } }"}'
```
The second command's response already returns each fulfillment's `id` as a full `gid://shopify/Fulfillment/...` value — copy it as-is into ``.
The log should show `"rule":"delivery-issue"`, and the ticket should land in the store's shipping team with the carrier message in its body.
The fraud-review rule rarely triggers on a development store, since Shopify's
risk assessment seldom returns `HIGH` there. `src/routing/rules.test.ts`
covers it directly.
## Use ticket context beyond just routing
Every ticket this service creates already carries the `shopify_order_id` and `shopify_order_url` custom fields, plus tags like `payment-review` or `delivery-issue` naming the rule that matched.
Once a value is on the ticket, you can use it outside this service too. A payment issue from any store routes to the same **Payments** team. You can use [List tickets](/docs/api/ticketing/tickets/list-tickets) filtered on `payment-review` to pull every open payment issue from every store into one list, instead of checking each store's queue separately.
The [New tickets](/docs/api/ticketing/reports/new-tickets) report takes the same `tagIDs` and `teamIDs` filters, but for trend analysis. Filter the request by the `delivery-issue` tag to chart delivery-failure volume per store over time.
A ticketing [rule](/docs/api/ticketing/rules/create-rule) can trigger on a tag this service sets, too — send an automatic follow-up message if a `delivery-issue` ticket goes unanswered for a day.
To add another Shopify detail to a ticket, follow the same path this data already takes: read the value from the Admin API in `src/shopify/admin.ts`, then write it onto the ticket as a field or a tag in `src/ticketing/build-ticket.ts`. Which additional Shopify data is worth adding this way, and what you build on top of it, is up to your team.
## Adapt the routing rules
`src/routing/rules.ts` holds the routing table as an ordered list: the first rule whose condition matches decides the ticket's team, priority, and tags, and the VIP override in the same file can then replace that outcome. Each rule reads from the enriched event (`src/shopify/admin.ts`'s `getOrderContext`) and the store's configuration, so a new condition on an event this sample already handles — a different spend threshold, an additional fulfillment status, a new team — is a change to that one file.
`src/ticketing/build-ticket.ts` decides what goes on the ticket itself, including the custom fields and the requester.
Routing on a Shopify event this sample doesn't subscribe to at all is a wider change, touching three files:
* Add the topic and its payload schema to `src/shopify/schemas.ts`.
* Add its GraphQL enum spelling to `TOPIC_ENUM` in `scripts/register-webhooks.ts`.
* Add the rule that reads it to `rules.ts`.
The project also includes `npm test`, `npm run typecheck`, and `npm run lint`, which cover the routing table, the ticket builder, the webhook handler, and the Shopify API clients — run them after any change to `src/`.
A rule only has data to work with if something already put it on the enriched event or the store configuration. If you want to route on a Shopify signal this sample doesn't already fetch, extend the Admin GraphQL query in `src/shopify/admin.ts` alongside the rule that reads it.
## Troubleshooting
| Symptom | Likely cause |
| --------------------------------------------------------------- | ------------------------------------------------------------------------------------------------------------------------------------------------------------------------------------------------------------------------------------------------------ |
| The service prints "Ticketing account is missing" at boot | The "Provision teams, tags, and custom fields" step didn't finish — rerun `npm run setup:ticketing` |
| The service prints "Configuration is incomplete" at boot | A value in `.env` or `config/stores.json` is missing or malformed — the error names which one |
| Nothing arrives at the service | `PUBLIC_URL` doesn't match the running tunnel, or the webhooks aren't registered — rerun `npm run register:webhooks` |
| Service returns `app_not_installed`/`invalid signature` | The service was started before you set `.env`, and the watcher doesn't reload it — restart `npm run dev` |
| The boot log's URL, account, or app prefix doesn't match `.env` | A shell auto-loader such as `direnv` or the oh-my-zsh `dotenv` plugin exported an earlier version of `.env` before `--env-file` could set it, and `--env-file` never overrides an already-set variable — re-enter the directory or open a new terminal |
| 401 `unknown store` | The request's `X-Shopify-Shop-Domain` doesn't match any `shopDomain` in `config/stores.json` |
| 401 `invalid signature` | `SHOPIFY__CLIENT_SECRET` doesn't match the secret Shopify signed with — check which app credential is active |
| 400 `payload did not match the expected shape` | The response lists the rejected fields — compare them with the delivery shown in the ngrok web interface |
| 502 | The Admin API call or the ticket creation failed; the logged response body names which one. Shopify redelivers after a 502, so a fixed service usually receives the same event again |
| A ticket's customer fields are empty | Confirm that a development store was created with the Grow plan, or that a non-development store uses Grow or higher. Also confirm that the installed app has the released `read_orders` and `read_customers` scopes |
| A restart created a duplicate ticket | Deduplication is in memory only — expected in this sample, and the reason it isn't production-ready as shipped |
## Prepare the service for production
This sample demonstrates the integration end to end, but three choices need to change before you run it against real orders:
`src/dedupe.ts` keeps seen webhook IDs in a process-local set. A restart
forgets them, so a redelivery after a restart creates a second ticket. Replace
it with Redis or a database so deduplication survives restarts and works
across more than one instance.
Shopify expects a response within 5 seconds of a webhook delivery. The Admin
API lookup and ticket creation fit that window in this sample, but under load,
queue the enrichment and ticket-creation work and acknowledge the webhook
first.
`.env` and `config/stores.json` are already excluded from Git. Use your
deployment platform's secrets manager instead of files on disk, and rotate the
Shopify client secret and the Text personal access token like any other
credential — both are read once, at startup.
***
**Keep exploring**
Then, release the app version.
Customer names and email addresses are protected customer data. For a
custom app, the scopes you added provide access after installation; no
separate data-access request is needed.
Install the app on every store you created, either from the install button next to the store or through a generated install link opened while signed in to that store.
From the app's settings page, copy the **client ID** and **client secret**. The service exchanges them for a 24-hour Admin API token per store, and Shopify signs every webhook with the same client secret.
## Set up the Text side
In Text, go to **Settings → API access → [Personal access tokens](https://www.text.com/app/settings/integrations/api-access/personal-access-tokens)** and create a token with the `accounts--my:ro` [scope](/docs/authentication/scopes) — this is the scope the ticketing API expects for authentication.
Note your **account ID**, shown next to the token. The service sends the token as HTTP Basic auth, with the account ID as the username and the token as the password.
Treat the personal access token like a password. Store it in a secrets
manager for a deployed service, and never commit it to a repository.
In the terminal, clone the repository and install its dependencies:
```shell theme={null}
git clone https://github.com/livechat/shopify-text-ticketing.git
cd shopify-text-ticketing
npm install
cp config/stores.example.json config/stores.json
cp .env.example .env
```
In `config/stores.json`, keep one entry per Shopify store you created and remove the rest. Set each entry's `key` to the name you gave the store and `shopDomain` to its real domain. In our example:
```json config/stores.json theme={null}
{
"stores": [
{
"key": "main",
"label": "Acme Main",
"shopDomain": "acme-main.myshopify.com",
"credentialsKey": "ACME",
"shippingTeam": "Orders & Shipping",
"vipThreshold": 1000
},
{
"key": "outlet",
"label": "Acme Outlet",
"shopDomain": "acme-outlet.myshopify.com",
"credentialsKey": "ACME",
"shippingTeam": "Orders & Shipping",
"vipThreshold": 500
}
]
}
```
`credentialsKey` points a store at its `SHOPIFY__CLIENT_ID` and `SHOPIFY__CLIENT_SECRET` pair in `.env` — the name itself doesn't matter, as long as it matches. Use the same key for every store on the same Shopify app; give a store a different key only if it uses a different app.
In `.env`, set `TEXT_ACCOUNT_ID`, `TEXT_PAT`, `SHOPIFY_ACME_CLIENT_ID`, and `SHOPIFY_ACME_CLIENT_SECRET` from the values you copied — the `ACME` suffix matches the `credentialsKey` you kept in `config/stores.json`.
Leave `PUBLIC_URL` empty for now — you'll set it after starting a tunnel.
Run the setup script:
```shell theme={null}
npm run setup:ticketing
```
This creates the teams the routing table refers to (Payments, Returns & Refunds, VIP, and each store's shipping team), the tags each team needs, and two custom fields the ticket carries: `shopify_order_id` and `shopify_order_url`. The script prints one line per resource and is safe to rerun — it doesn't touch anything that already exists.
Each tag is either shared with every team or scoped to one team. The script creates missing tags as shared, because the rule tags a VIP escalation keeps on the ticket (`payment-review`, `refund`, `delivery-issue`) and the per-store tags need to be visible to whichever team the ticket lands in.
If a tag your rules need already exists but is scoped to a different team, the script names it and exits — widen that tag to all teams in the Text app, then rerun the script.
## Run the service and expose it to Shopify
Shopify only delivers webhooks to a public HTTPS address, so a local run needs a tunnel in front of it.
```shell theme={null}
npm run dev
```
A successful start prints:
```text theme={null}
Listening on http://localhost:3000 for 2 store(s)
```
In a separate terminal, start a tunnel to the port the service is listening on:
```shell theme={null}
ngrok http 3000
```
Copy the `https` forwarding address ngrok prints, without a trailing slash, into `.env` as `PUBLIC_URL`. Restart `npm run dev` with the same command — the watcher restarts automatically on source and `config/stores.json` changes, but not on `.env` changes, so a manual restart is always required after editing it.
ngrok's free plan issues a new forwarding address every time the tunnel restarts. When that happens, update `PUBLIC_URL`, restart `npm run dev`, and rerun the next step so Shopify's subscriptions point at the current address. ngrok's local web interface shows every request it forwards at `http://127.0.0.1:4040` while the tunnel runs, which is useful while testing.
If the service already runs somewhere with a stable public HTTPS address, skip ngrok and set `PUBLIC_URL` to that address directly.
```shell theme={null}
npm run register:webhooks
```
This subscribes every configured store to the three topics the service handles, pointing them at `PUBLIC_URL`. A successful run prints one `created` line per store and topic; rerunning it prints `exists`. Because these subscriptions are created through the API rather than the Shopify admin UI, this command is also how you inspect them — they don't appear on the store's **Notifications** page.
## Test the result
During testing, keep the `npm run dev` terminal visible — each delivery logs one JSON line naming the matched rule and ticket.
In one store's admin, create an order with a customer email, choose **Payment due later**, and place it. The log should show `"rule":"pending-payment"`, and a new high-priority ticket should appear in **Payments**, tagged with the store's key and `payment-review`, with the customer as requester and a link to the order.
Create another order in the same store and mark it paid immediately instead of leaving payment pending. The log should show `no ticket needed` — a paid, low-risk order matches no rule.
That confirms the core flow, both when a ticket should exist and when it shouldn't. The scenarios below check the other rules.
In a store's admin, create an order, mark it as paid, then issue a partial
refund on it. The log should show `"rule":"refund"`, and a ticket should
appear in **Returns & Refunds** at medium priority, quoting the refunded
amount.
Create a pending-payment order in a second store. The ticket should land in
the same **Payments** team, tagged with that store's own key instead of the
first store's.
Set a store's `vipThreshold` in `config/stores.json` to a value below one of
its customers' lifetime spend — the dev server picks up the change on its own
— then create a pending-payment or refund order for that customer. The log
should show the rule name suffixed with `+vip`, and the ticket should land in
the VIP team at urgent priority.
Shopify's admin has no button for a carrier event, so simulate one through the Admin API. First fulfill the paid order from its page with **Fulfill items**. Then, with your store's domain and app credentials, fetch a token, find the fulfillment's GID, and record a failed delivery:
```shell theme={null}
STORE=acme-main.myshopify.com
TOKEN=$(curl -s -X POST "https://$STORE/admin/oauth/access_token" \
-d grant_type=client_credentials -d client_id="" -d client_secret="" \
| node -pe 'JSON.parse(require("fs").readFileSync(0)).access_token')
curl -s "https://$STORE/admin/api/2025-07/graphql.json" \
-H "X-Shopify-Access-Token: $TOKEN" -H "Content-Type: application/json" \
-d '{"query":"{ orders(first: 5, reverse: true) { nodes { name fulfillments { id } } } }"}'
curl -s "https://$STORE/admin/api/2025-07/graphql.json" \
-H "X-Shopify-Access-Token: $TOKEN" -H "Content-Type: application/json" \
-d '{"query":"mutation { fulfillmentEventCreate(fulfillmentEvent: { fulfillmentId: \"\", status: FAILURE, message: \"Address not found\" }) { fulfillmentEvent { id } userErrors { message } } }"}'
```
The second command's response already returns each fulfillment's `id` as a full `gid://shopify/Fulfillment/...` value — copy it as-is into ``.
The log should show `"rule":"delivery-issue"`, and the ticket should land in the store's shipping team with the carrier message in its body.
The fraud-review rule rarely triggers on a development store, since Shopify's
risk assessment seldom returns `HIGH` there. `src/routing/rules.test.ts`
covers it directly.
## Use ticket context beyond just routing
Every ticket this service creates already carries the `shopify_order_id` and `shopify_order_url` custom fields, plus tags like `payment-review` or `delivery-issue` naming the rule that matched.
Once a value is on the ticket, you can use it outside this service too. A payment issue from any store routes to the same **Payments** team. You can use [List tickets](/docs/api/ticketing/tickets/list-tickets) filtered on `payment-review` to pull every open payment issue from every store into one list, instead of checking each store's queue separately.
The [New tickets](/docs/api/ticketing/reports/new-tickets) report takes the same `tagIDs` and `teamIDs` filters, but for trend analysis. Filter the request by the `delivery-issue` tag to chart delivery-failure volume per store over time.
A ticketing [rule](/docs/api/ticketing/rules/create-rule) can trigger on a tag this service sets, too — send an automatic follow-up message if a `delivery-issue` ticket goes unanswered for a day.
To add another Shopify detail to a ticket, follow the same path this data already takes: read the value from the Admin API in `src/shopify/admin.ts`, then write it onto the ticket as a field or a tag in `src/ticketing/build-ticket.ts`. Which additional Shopify data is worth adding this way, and what you build on top of it, is up to your team.
## Adapt the routing rules
`src/routing/rules.ts` holds the routing table as an ordered list: the first rule whose condition matches decides the ticket's team, priority, and tags, and the VIP override in the same file can then replace that outcome. Each rule reads from the enriched event (`src/shopify/admin.ts`'s `getOrderContext`) and the store's configuration, so a new condition on an event this sample already handles — a different spend threshold, an additional fulfillment status, a new team — is a change to that one file.
`src/ticketing/build-ticket.ts` decides what goes on the ticket itself, including the custom fields and the requester.
Routing on a Shopify event this sample doesn't subscribe to at all is a wider change, touching three files:
* Add the topic and its payload schema to `src/shopify/schemas.ts`.
* Add its GraphQL enum spelling to `TOPIC_ENUM` in `scripts/register-webhooks.ts`.
* Add the rule that reads it to `rules.ts`.
The project also includes `npm test`, `npm run typecheck`, and `npm run lint`, which cover the routing table, the ticket builder, the webhook handler, and the Shopify API clients — run them after any change to `src/`.
A rule only has data to work with if something already put it on the enriched event or the store configuration. If you want to route on a Shopify signal this sample doesn't already fetch, extend the Admin GraphQL query in `src/shopify/admin.ts` alongside the rule that reads it.
## Troubleshooting
| Symptom | Likely cause |
| --------------------------------------------------------------- | ------------------------------------------------------------------------------------------------------------------------------------------------------------------------------------------------------------------------------------------------------ |
| The service prints "Ticketing account is missing" at boot | The "Provision teams, tags, and custom fields" step didn't finish — rerun `npm run setup:ticketing` |
| The service prints "Configuration is incomplete" at boot | A value in `.env` or `config/stores.json` is missing or malformed — the error names which one |
| Nothing arrives at the service | `PUBLIC_URL` doesn't match the running tunnel, or the webhooks aren't registered — rerun `npm run register:webhooks` |
| Service returns `app_not_installed`/`invalid signature` | The service was started before you set `.env`, and the watcher doesn't reload it — restart `npm run dev` |
| The boot log's URL, account, or app prefix doesn't match `.env` | A shell auto-loader such as `direnv` or the oh-my-zsh `dotenv` plugin exported an earlier version of `.env` before `--env-file` could set it, and `--env-file` never overrides an already-set variable — re-enter the directory or open a new terminal |
| 401 `unknown store` | The request's `X-Shopify-Shop-Domain` doesn't match any `shopDomain` in `config/stores.json` |
| 401 `invalid signature` | `SHOPIFY__CLIENT_SECRET` doesn't match the secret Shopify signed with — check which app credential is active |
| 400 `payload did not match the expected shape` | The response lists the rejected fields — compare them with the delivery shown in the ngrok web interface |
| 502 | The Admin API call or the ticket creation failed; the logged response body names which one. Shopify redelivers after a 502, so a fixed service usually receives the same event again |
| A ticket's customer fields are empty | Confirm that a development store was created with the Grow plan, or that a non-development store uses Grow or higher. Also confirm that the installed app has the released `read_orders` and `read_customers` scopes |
| A restart created a duplicate ticket | Deduplication is in memory only — expected in this sample, and the reason it isn't production-ready as shipped |
## Prepare the service for production
This sample demonstrates the integration end to end, but three choices need to change before you run it against real orders:
`src/dedupe.ts` keeps seen webhook IDs in a process-local set. A restart
forgets them, so a redelivery after a restart creates a second ticket. Replace
it with Redis or a database so deduplication survives restarts and works
across more than one instance.
Shopify expects a response within 5 seconds of a webhook delivery. The Admin
API lookup and ticket creation fit that window in this sample, but under load,
queue the enrichment and ticket-creation work and acknowledge the webhook
first.
`.env` and `config/stores.json` are already excluded from Git. Use your
deployment platform's secrets manager instead of files on disk, and rotate the
Shopify client secret and the Text personal access token like any other
credential — both are read once, at startup.
***
**Keep exploring**
[Ticketing API reference](/docs/api/ticketing)