

Prerequisites
- A Text account on the Growth plan or higher, with administrator access and API access permission.
- The Text AI Agent enabled and answering new chats.
- A Salesforce account with administrator access and API access enabled.
- Docker with Docker Compose v2, to build and run the service in a container.
cloudflared, to give the local service a temporary public HTTPS address. Skip it if the service already has one.- Git to clone the sample repository.
livechat/salesforce-route-chat-guide
Loading repository data...
This guide is based on a sample service repository. You set up Salesforce yourself, with a tier field on Contacts and an External Client App that lets the service read them. On startup, the service creates the
salesforce_plan_tier property and the required chatting teams in Text if they don’t exist.
How a chat gets routed
- Text sends a webhook when a new chat starts.
- The service finds the customer’s Contact in Salesforce by email. If there’s no email, no single matching Contact, or an empty tier, the service skips the chat.
- It saves the tier on the customer’s Text profile.
- For Enterprise, it also sets the customer’s relationship level to VIP. Other tiers leave it unchanged.
- It transfers the chat based on the customer plan tier: Basic stays with the AI Agent, Standard goes to the Regular team, and Enterprise goes to the Enterprise team.
Set up Salesforce
1
Prepare the Contact tier field
In Salesforce, find the gear icon in the upper right corner, and go to Setup → Object Manager → Contact.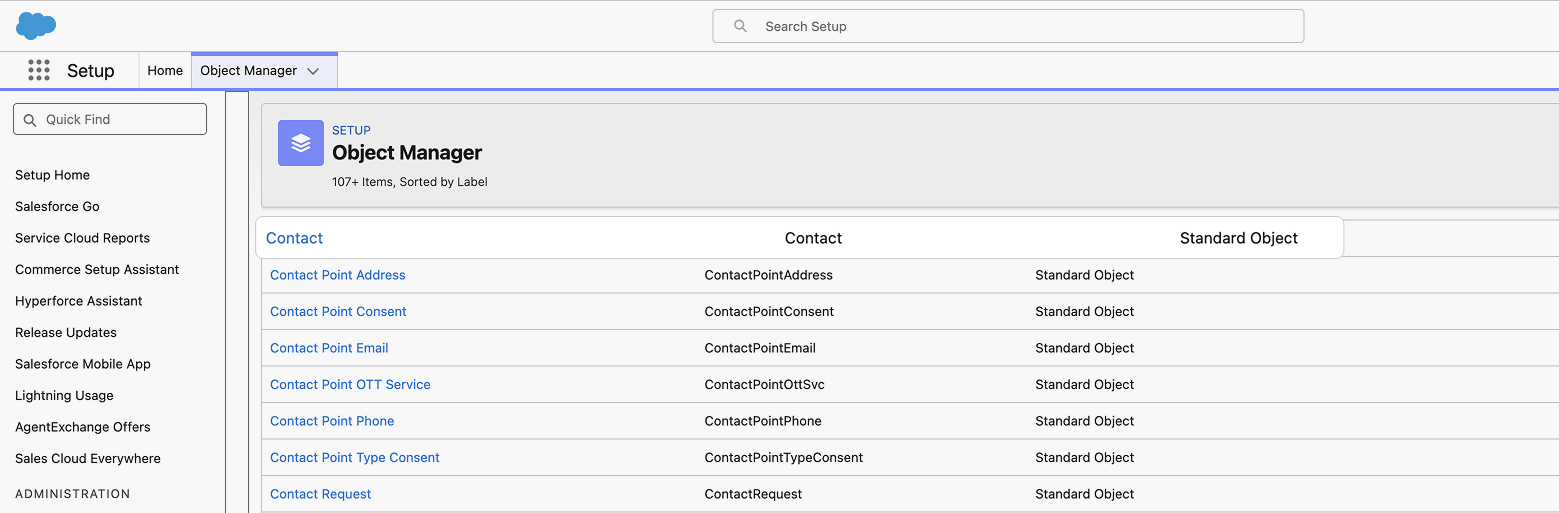
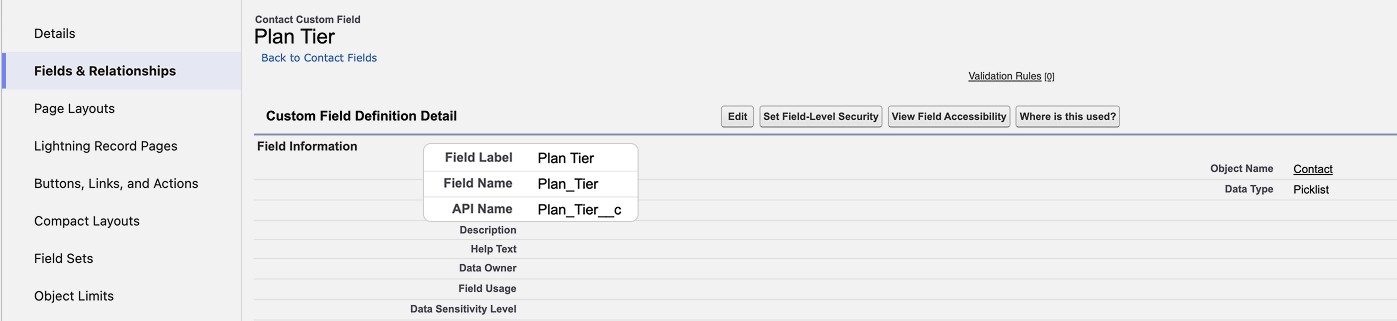
Basic, Standard, and Enterprise as its values. Leave the Default Value empty.Leave the remaining field settings at their default values, then save the field.Once the field is saved, open its details from the Fields & Relationships list, and note the field’s API Name (for example, Plan_Tier__c). You’ll set this as SALESFORCE_PLAN_FIELD later.The service matches these three plan tier values exactly, including capitalization. If you use different names, update the
switch in the internal/router/handler.go file before you start the service. Other values are still saved to the customer profile, but they don’t route the chat or set VIP.2
Create test Contacts
From the App Launcher, open Sales and go to Contacts. Create or edit three test Contacts with distinct email addresses, and assign one tier to each Contact.You’ll use these addresses to start test chats later. The email address that a customer provides in Text must match their Contact’s email address.Multiple Salesforce Contacts sharing the same email cause that chat to be skipped.
3
Create an integration user
The service signs in to Salesforce as a user of its own, so it needs permission to read your Contacts. It never edits them.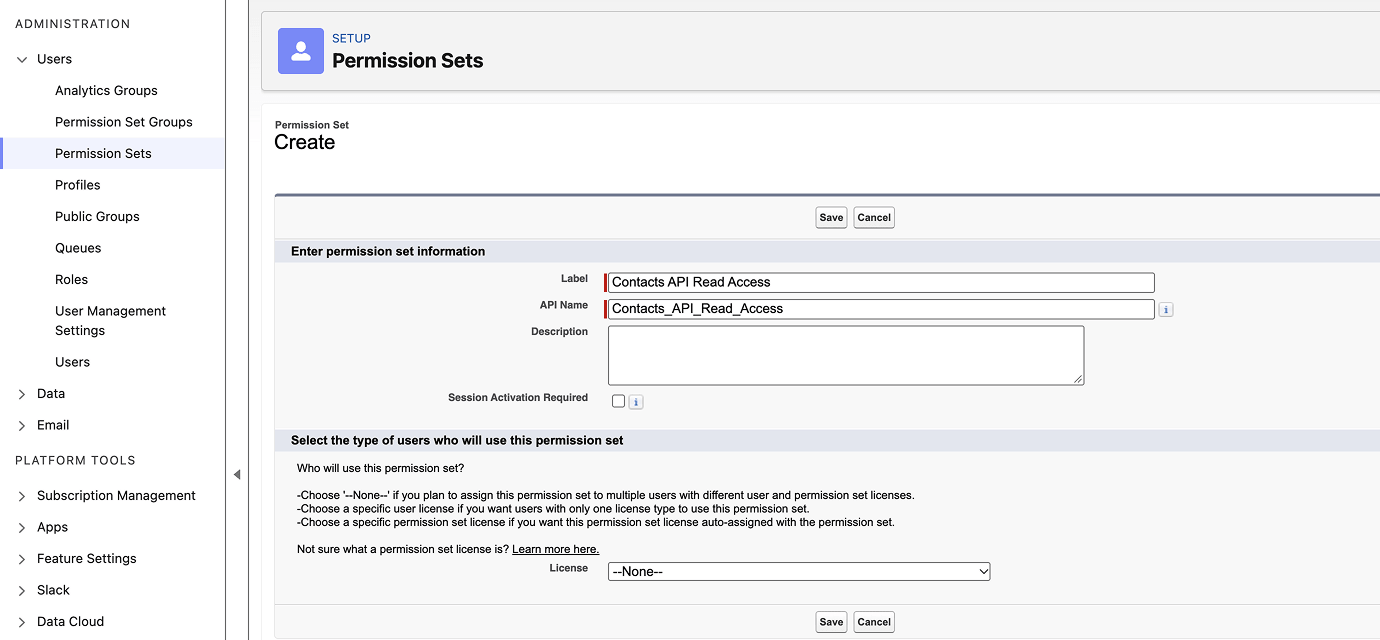
- Create a user for this service, or pick an existing one. For testing, you can use your own user.
- In Setup → Users → Permission Sets, create a new permission set. Name it, for example, Contacts API Read Access and save changes.
- In the permission set, go to System → System Permissions and enable API Enabled. This lets the user sign in through the API, but it doesn’t grant access to any data.
- Under Object Settings → Contacts, grant Read access to the Contact object, and read access to the Email and Plan Tier fields.
- Assign the permission set to that user.
4
Create an External Client App
Open Setup and go to Apps → External Client Apps → External Client App Manager. Create a new External Client App for this service.
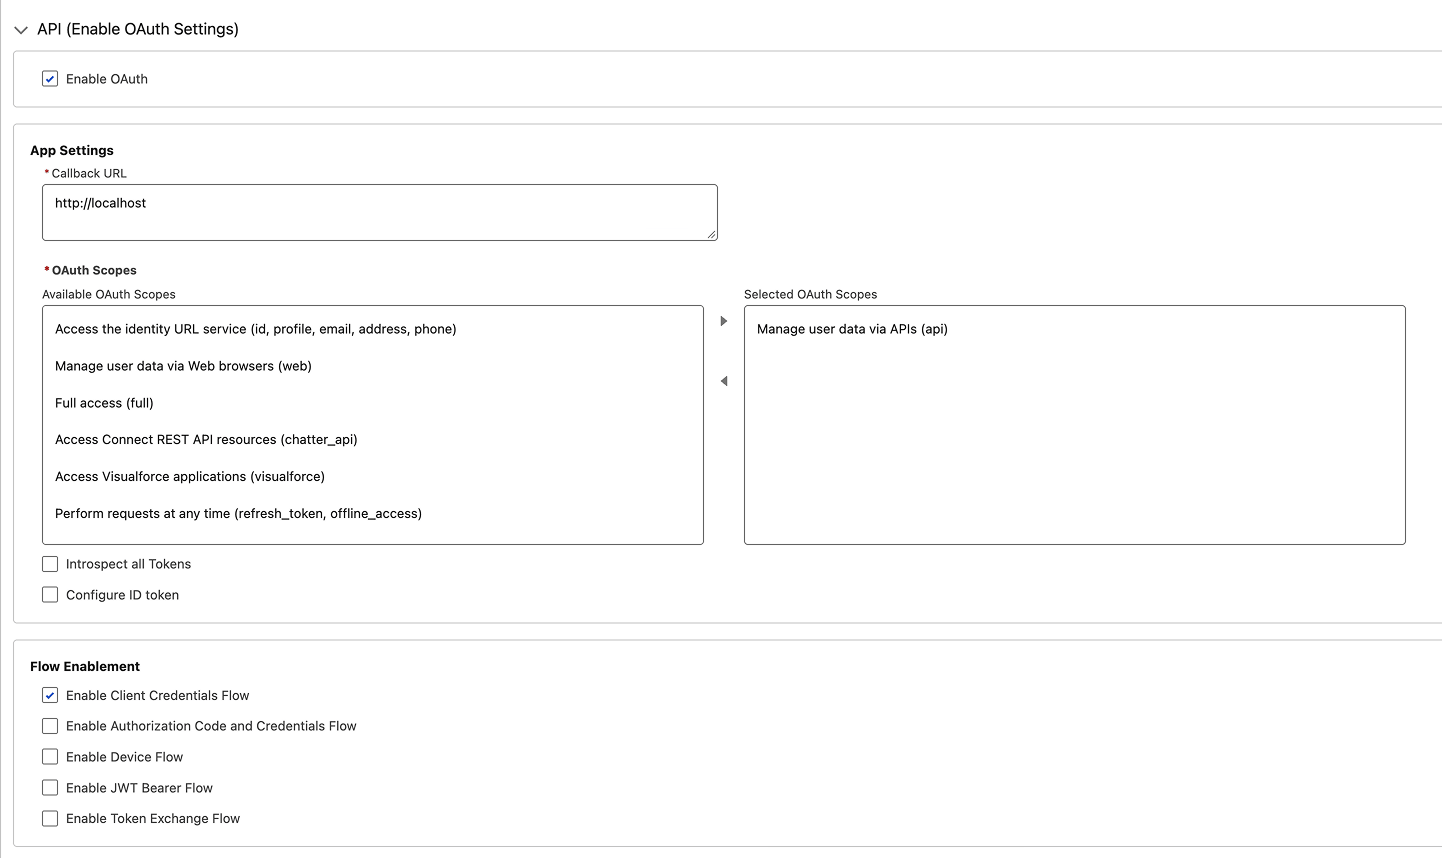
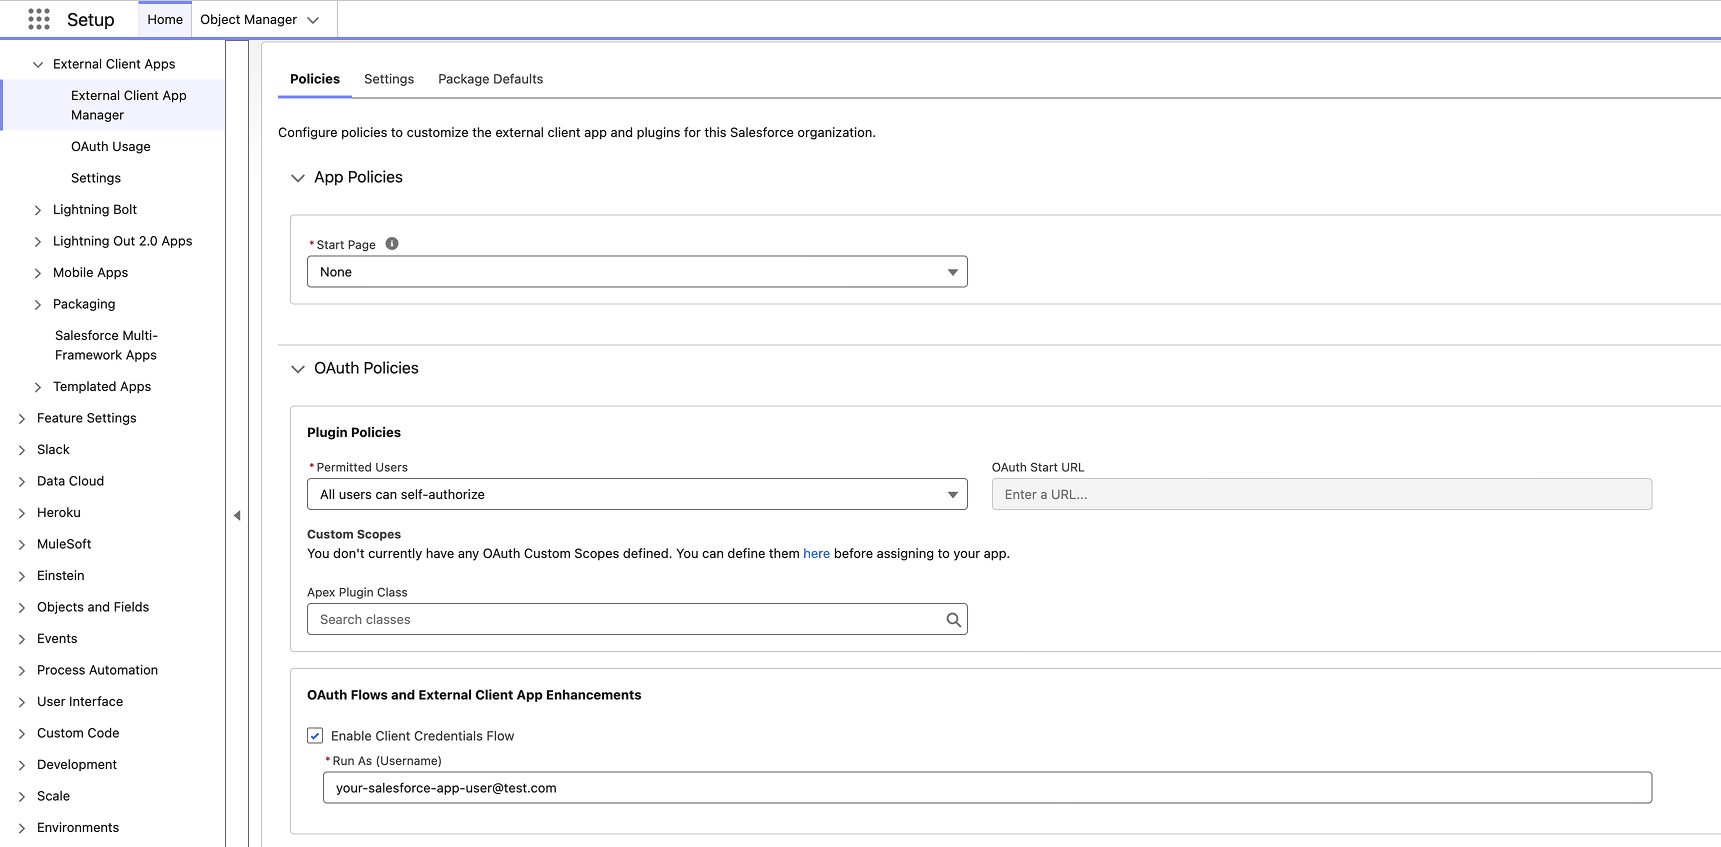
http://localhost — it’s fine during testing since the app doesn’t make any redirects. Add the api scope and check Enable Client Credentials Flow under Flow Enablement. Then Create the app.https://your-company.my.salesforce.com. A sandbox URL looks like https://your-company--sandbox.sandbox.my.salesforce.com. You’ll set this as SALESFORCE_LOGIN_URL.Set up Text
Text calls routing destinations teams in the app. Its APIs and the sample
service call them groups.
1
Create a personal access token
In Settings → API access → Personal access tokens, create a token with these scopes:
customers:rw— to read and write the customer’s plan-tier property.chats--all:rw— to check chat status and transfer chats in any group.groups--all:rw— only if Regular or Enterprise doesn’t exist yet and you want the service to create it. Usegroups--all:roinstead if you create both groups manually first.
account_id:personal_access_token value.2
Clone and configure the service
.env.Fill in .env with the values from the previous steps:Leave
TEXT_WEBHOOK_SECRET empty for now — you’ll add it after creating the webhook in a later step.Run the service
1
Get a public URL
Text delivers webhooks to a public internet address, so if you’re running the service on your own computer rather than a server, start a Cloudflare Quick Tunnel in another terminal:Keep it running and copy the HTTPS address it prints, such as
https://example.trycloudflare.com. For a deployed service, use its public HTTPS address instead.2
Create the Text webhook
In the Text app, open Settings → API access → Webhooks. Create a webhook for the
incoming_chat event scoped to all chats, and set its destination to your public address plus /webhooks/text — for example, https://example.trycloudflare.com/webhooks/text. Save it, then copy the secret Text generates into TEXT_WEBHOOK_SECRET in .env.3
Start the service
Salesforce chat routing ready, confirm the health check:204. On startup, the service verifies the Text property and groups. It creates any missing resources and confirms that the Salesforce integration user can read the Contact tier field. Restarts reuse resources that are already present.Text configuration changes can take up to 2 minutes to become readable.4
Test the routing
Start a separate Text chat with each test Contact’s email:To retest after changing a Contact’s tier, close the current conversation and start a new one.
- Basic: the chat stays with the AI Agent.
- Standard: the chat moves to Regular.
- Enterprise: the chat moves to Enterprise, and the customer is marked VIP — highlighted in the customer list and moved to the top of the chatting queue.
salesforce_plan_tier property, shown as a customer field while you’re chatting with them.Transfers aren’t instant. The webhook runs after the chat opens, so the AI Agent may answer first.
Use tiers in reports and segments
Standard and Enterprise chats each land in their own team, which lets you break down Reports API metrics by tier. Filter response time, chat volume, or ratings by a group’s ID, and the numbers reflect that tier’s chats. For the cleanest numbers, reserve the Regular and Enterprise teams for this routing alone. You can also list customers by tier because the tier is saved on each customer’s profile. Use the List customers endpoint to filter by tier and combine it with other filters. For example, you can find Enterprise customers who have gone quiet or the key accounts that contact you most. A segment can also use the property to find every customer who has a tier saved. None of this is limited to plan tier. If you adapt the service to route on another Salesforce field, such as region, each group you route to gets its own reports, and any property you save on a customer profile can be used to list customers the same way.Troubleshooting
Prepare the design for production
The service works for testing as is. Before you run it for real customers, review these two points.Make webhook handling idempotent
Make webhook handling idempotent
Each webhook delivery is processed independently. A repeated delivery for the same thread can repeat the tier or VIP write, or the chat transfer. If the tier or VIP write fails, the service returns an error and skips the transfer for that delivery.Before you deploy the service:
- Record processed chat and thread IDs so a repeated delivery doesn’t repeat the transfer.
- Add a durable job queue so a restart doesn’t drop a delivery that arrived mid-process.
Check human-agent membership in both teams
Check human-agent membership in both teams
On startup, the service checks that each API group contains at least one member whose priority is not
supervisor. This check doesn’t distinguish human agents from the AI Agent. The service creates a missing group with the human agents listed in .env, but it doesn’t add agents to or change the membership of a group that already exists.In the Text app, confirm that each routing team contains an eligible human agent. You must also enable the AI Agent and confirm its initial team assignment manually.If an AI Agent is also a member of Regular or Enterprise, its priority there determines whether it can catch a transferred chat instead of a human agent. Set its priority to supervisor in that team if you want every Standard- or Enterprise-tier chat to reach a human.Keep exploring
Customer Data Platform API
reference
Reports API reference
Transfer
chat
Set customer properties
values